Skip to content

PFA SKINMATCH DCTL

Perfecting Skintone in Seconds! ​

Original price was: $169.00.Current price is: $69.00.

Step 1: Apply DCTL & Turn on Skintone Map

In the color tab, go to effects and search for DCTL. Then, search for PFA skin match. Apply it to any node on your node tree. Enable the Skintone Map, so you could see the color distribution across your image.

Play Video

Step 2: Limit Skintone Range

Next, limit the range of skin tones. This allows you to have a fine selection for the adjustment. Choose where you want the color adjustment to be applied. Orange indicates a perfect match to the skin tone line on the vectorscope. Yellow signifies that it is close, while blue means it is nowhere near the skin tone.
Play Video

Step 3: Adjust Skintone

You have three sliders available to adjust the skin tone. These sliders control hue, density, and saturation. For optimal results, ensure that the final skin tone falls within the orange zone.
Play Video

Perfect SkintoneIn Seconds

You can then focus solely on calibrating the skin tone. Using the hue, density, and saturation sliders, you can precisely adjust the saturation and match the skin tone to the ideal level. Additionally, you can use the skin range feature to narrow down your selection.

Play Video

DCTL: Perfecting Skintone in Seconds with PFA Skinmatch DCTL | Davinci Resolve Studio

What is SkinMatch DCTL and How Does it Work in Davinci Resolve Studio?

The DCTL toolkit features an advanced skin map that divides the entire image into three colors. Orange indicates a perfect match to the skin tone, yellow shows a close match, and blue signifies no match. With just one click, you can clearly see the color distribution.

This tool is compatible with all types of color spaces. Ensure you use this DCTL as the last node, specifically a serial node following your grade. Everything after this step should result in perfected skin tones.

You can then focus solely on calibrating the skin tone. Using the hue, density, and saturation sliders, you can precisely adjust the saturation and match the skin tone to the ideal level. Additionally, you can use the skin range feature to narrow down your selection.

All of this can be done within one DCTL interface. You no longer need to calibrate skin tone using multiple masks and effects. Now filmmakers!  You finally have one tool that lets you fix the skin in minutes accurately.

Can I Get a Free Demo of DCTL?

How to Access the Free Demo

To ensure you have the best experience, we’ve created a free demo version of the Skin Match DCTL for you to download. This version includes a watermark in your final grade. It gives you full access to the tool’s functions, allowing you to see the results of its calibration and the effectiveness of the skin map.

Exploring the Benefits of Testing SkinMatch Before Purchase

We created this free demo so you can experience the full functionality of the DCTL. This will show you how powerful and beneficial it can be for your project. 

You can test how effective this tool is before making a purchase, ensuring there is no risk involved. If the demo does not work with your software or your version of DaVinci Resolve, you won’t face any risk or cost.

PFA SkinMatch DCTL11 - Davinci Resolve Xnapper-2024-11-20-23.26.02

What to Expect from the Free Demo 

You are expecting the same skin tone density, saturation, hue, and the skin tone range sliders. These sliders allow you to precisely select and calibrate your skin tone. There is also a checkbox that, once enabled, lets you see the distribution of skin tone across the entire image. 

It’s always advisable to start with the range to narrow down your selection before doing the calibration. This is considered best practice. 

Another feature to expect from the free demo version is the watermark. If you enjoy the functionality of the tool, feel free to upgrade.

Understanding DCTL and Its Features

The Benefits of Using PFA SkinMatch DCTL for Skin Tone Adjustment

The biggest advantage of using  PFA Skin Match DCTL, is that you can map everything to the skin tone line on the vectorscope. This tool saves you a tremendous amount of time in calibrating skin tones. It also ensures that your cinematic color grading does not affect the skin tones, leading to results that clients will always approve.

The PFA Skin Match DCTL is GPU accelerated, making it fast and efficient. It works across all devices and is very light, so it doesn’t use a lot of your resources.

Be it if you are using RGB footage, LOG footage, or if there is an existing color shift in your lighting, you can fix all of these issues. This tool ensures that your skin tone appears perfect after caliberation.

This tool is extremely simple to use, zero complexity,  and it is designed with advanced color mapping built in. You can adjust skin tones without leaving the interface, allowing you to save time and focus on other important aspects of color grading. Read more to have a better overview of our tool!

How to Install and Set Up DCTL in Davinci Resolve?

Step-by-Step Installation Guide

Download DCTL Files:
Obtain the DCTL files you wish to install. This may involve downloading a DCTL pack from a website or repository. Ensure you have the files extracted and ready for use.

Locate the LUT Folder:
Open DaVinci Resolve and navigate to color page & LUTs folder. Right Click and find ‘Reveal in Finder’

Organize DCTL Files:
Copy the entire contents of the selected DCTL folder in to ‘LUT’ Folder

Refresh LUT folder:
Right Click ‘LUT’ Folder and select ‘Refresh’.

Restart DaVinci Resolve:
Close the LUT folder and restart DaVinci Resolve. This refreshes the software, allowing it to recognize the newly added DCTL files.

Using DCTL in Your Project:
After restarting, open an existing project or create a new one. Go to the Color Page, then open the Effects Panel. Search for “DCTL” in the effects panel and drag the desired DCTL effect onto a node in your node tree.

Load Your DCTL:
With the DCTL effect applied to a node, scroll down in the Inspector panel to load and apply your specific DCTL settings.

System Requirements

DaVinci Resolve Studio: DCTL is only supported in the paid version of DaVinci Resolve, known as DaVinci Resolve Studio. The free version does not support DCTL functionality. 

This tool is compatible with Mac, Linux platform, and Windows, provided you have the DaVinci Resolve Studio. It supports both Intel-built processors and Silicon chip on macs such as well as with the M1,  M2, M3, or M4 processors. It functions on all chips, including those on Intel, and AMD.

The only requirement is that you must have the paid version of DaVinci Resolve Studio.

Troubleshooting Common Installation Issues

DCTLs Not Appearing in Resolve
• Issue: After installation, the DCTLs do not show up in DaVinci Resolve.
• Solution: Ensure that the DCTL files are placed in the correct folder:
• For Windows: `C:\ProgramData\Blackmagic Design\DaVinci Resolve\Support\LUT`
• For macOS: `/Library/Application Support/Blackmagic Design/DaVinci Resolve/LUT`
After placing the files, restart DaVinci Resolve to refresh the LUTs.

How to Use PFA SKinMatch DCTL for Skin Tone Enhancement?

Utilizing the Skintone Map for precise color distribution

Visibility ensures precision. Our tool is a fusion of scope and color calibration sliders. The first step in using this tool is to activate the Skintone map by turning on the overlay checkbox. This feature is backed by complex coding that enables you to interpret your entire footage visually in three colors: orange, yellow, and blue, enabling focused understanding of your image.

Orange indicates a perfect match on the skin tone line. Yellow shows colors that are very close to the skin tone line. Blue represents colors that are nowhere near the skin tone line, indicating zero match.

By utilizing the skin tone map, you can precisely assess the color distribution after your grading. This analysis helps you make informed decisions on how to adjust or calibrate the skin tones effectively.

PFA SkinMatch DCTL2 - Davinci Resolve PFA SkinMatch DCTL - Davinci Resolve

Adjusting Skin Tone Range, Saturation, density and Hue for Perfect Skin Tones

To maintain the professional color quality of your image after color grading and to preserve the look development, you need to make precise selections. Specifically, you should focus on how much of the skin tone range is selected. 

Use the range tool to narrow down your selection to ensure it primarily captures the skin tones. This minimizes the impact on other areas affected by color grading. By doing so, you maintain consistency in your color grading and honor your previous color decisions.

Additionally, adjust the hue shift, density, and saturation to align the skin tones towards orange. This adjustment ensures a perfect match in skin tone.

Our tool provides you with the precise control needed to achieve and protect the most professional color quality in your image while safeguarding the skin tones.

PFA SkinMatch DCTL4 - Davinci Resolve PFA SkinMatch DCTL5 - Davinci Resolve

Common Techniques for Color Grading Skin Tones

Regarding post-production and the ideal hue range for skin, this tool has everything built in. As long as the skin color is orange, it aligns perfectly with the skin tone line on the vectorscope. Trust your color grading decisions and decide like a colorist, whether there is magenta or greenish tones on the skin. Just use the sliders to adjust them back to orange, and your skin tone will be perfect. This tool ensures that you always achieve the pixel perfect skin tone after calibration.

SALE 50% OFF

Limited TimeOffer

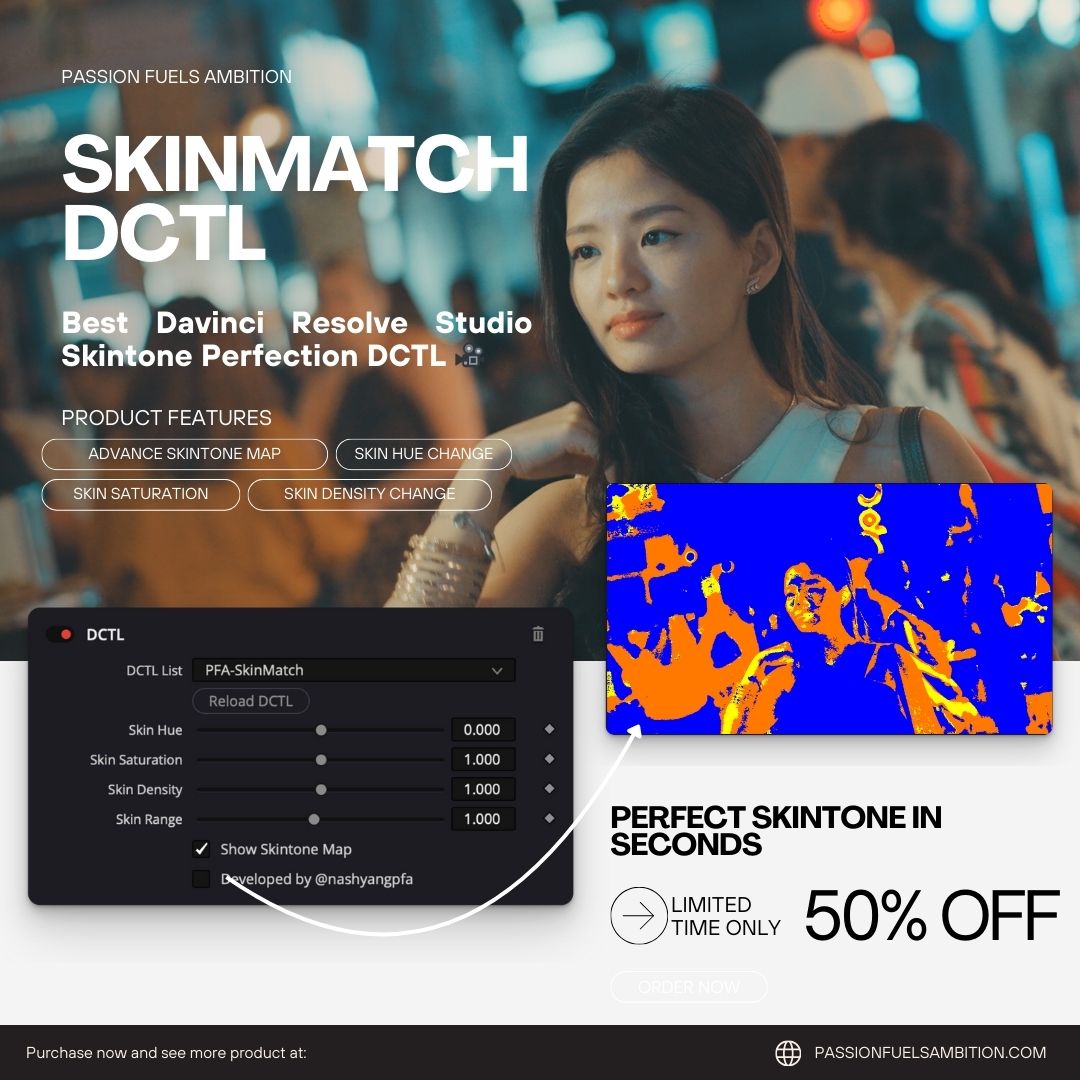
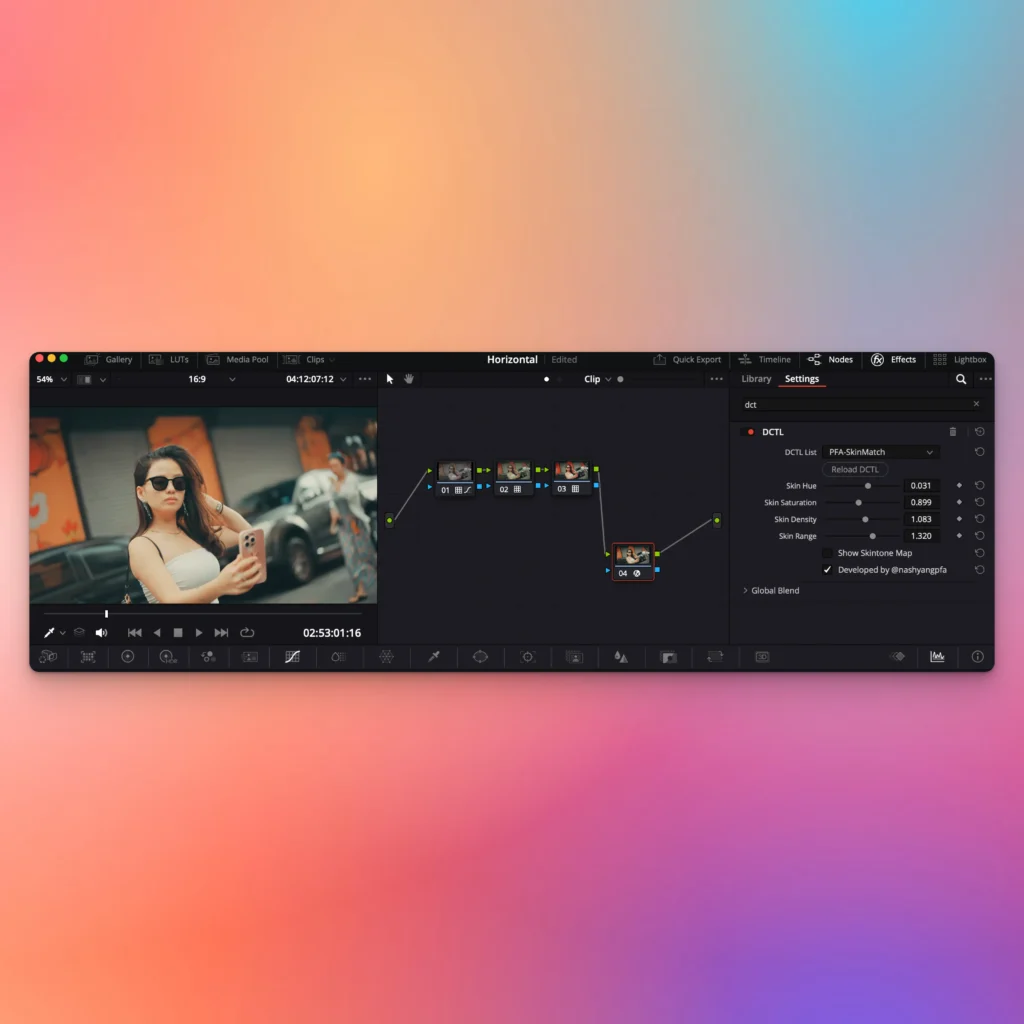
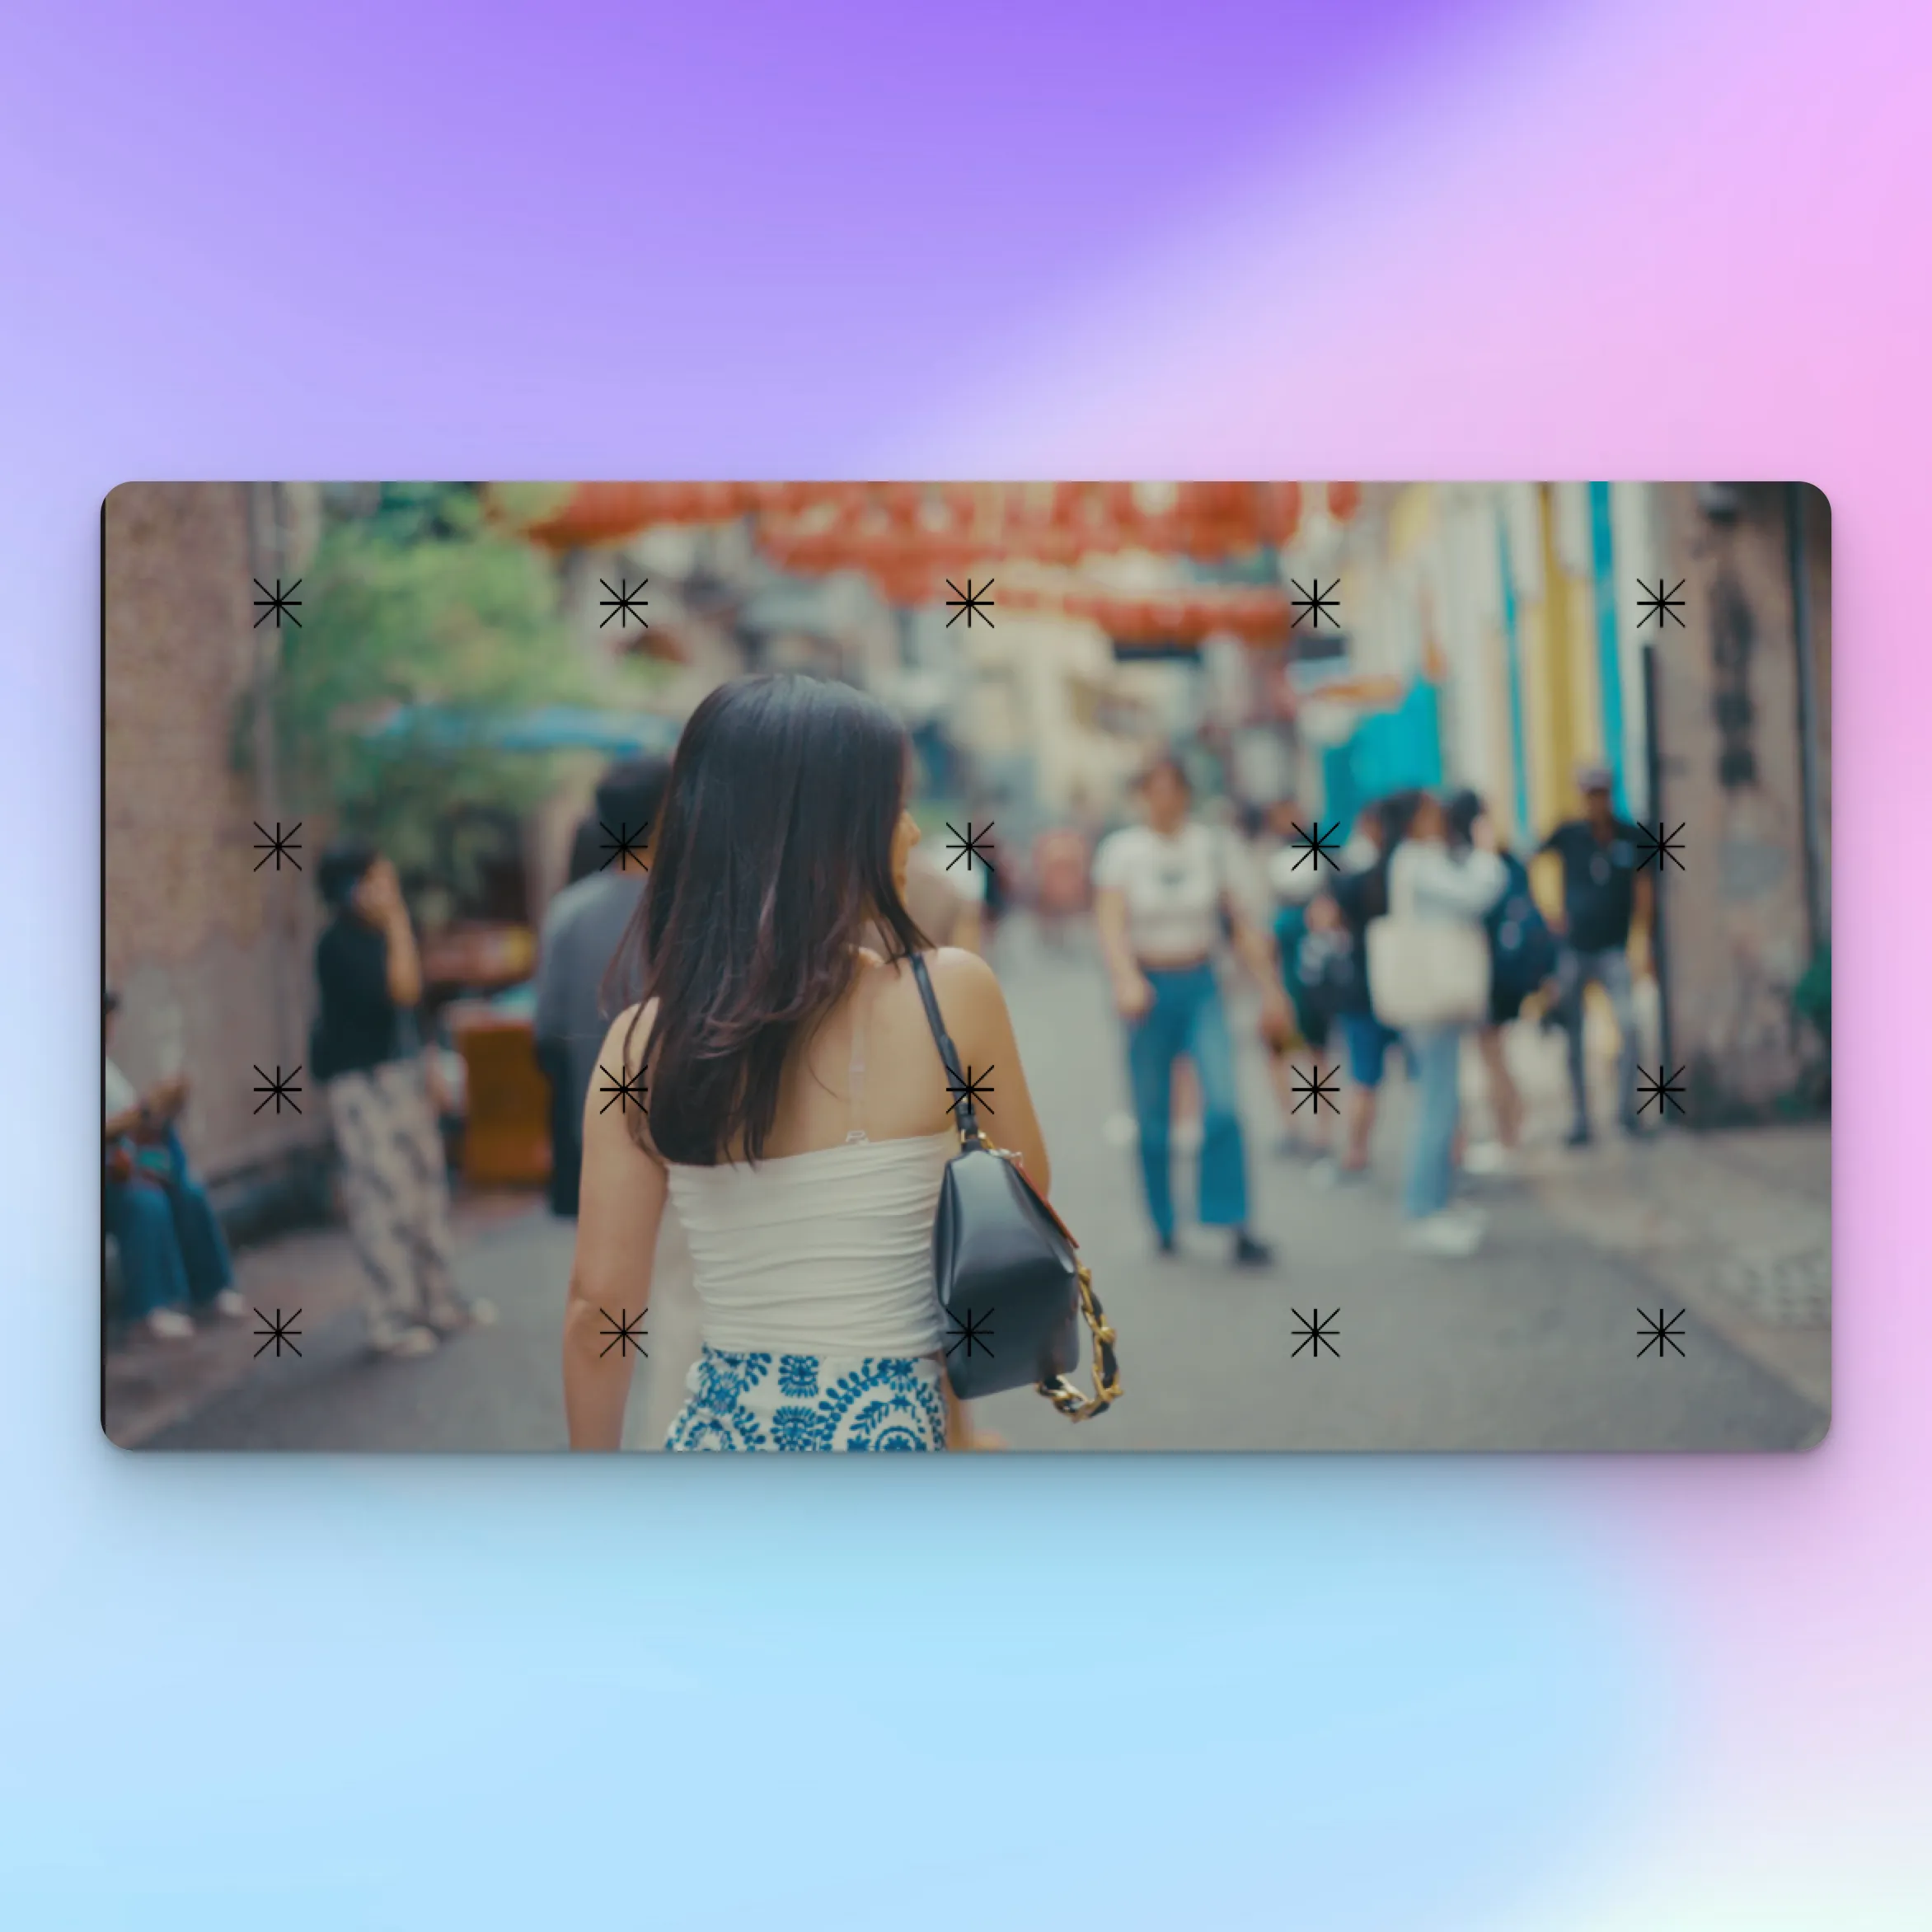
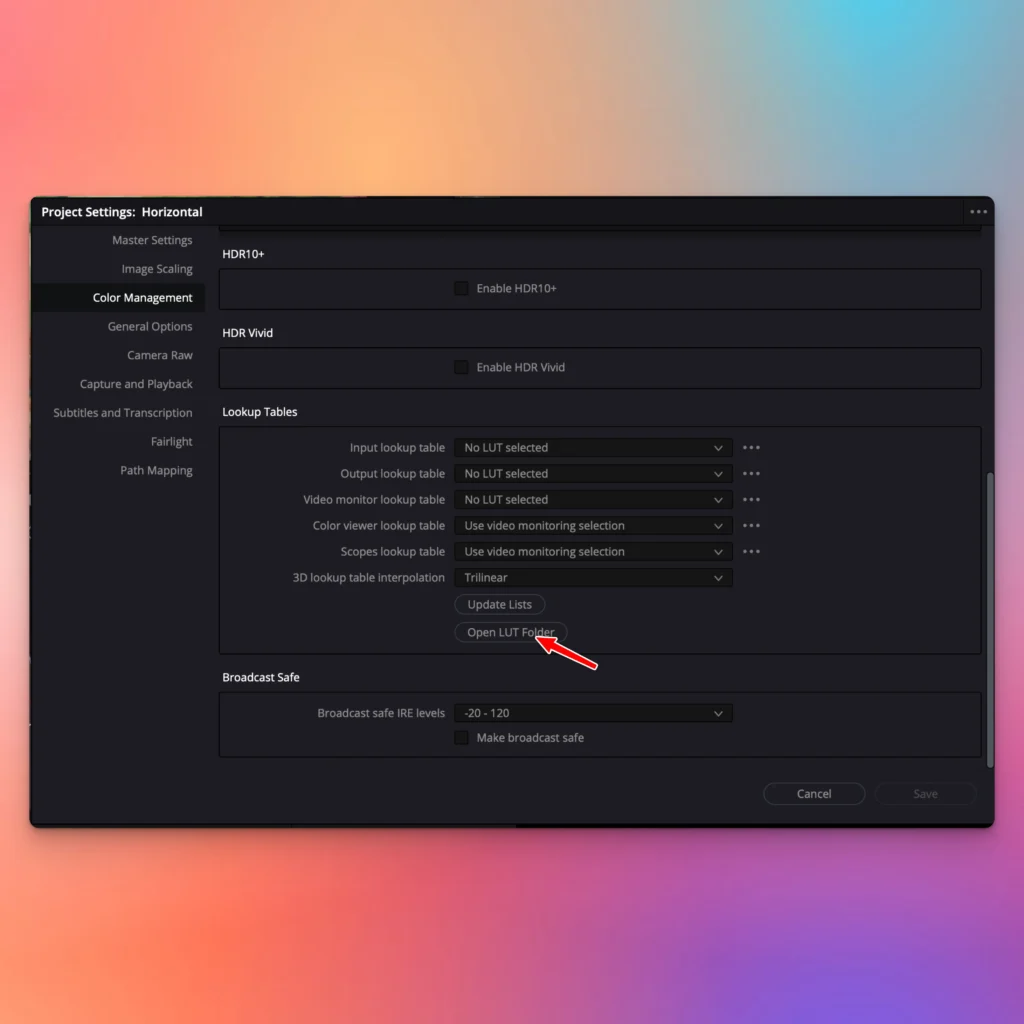
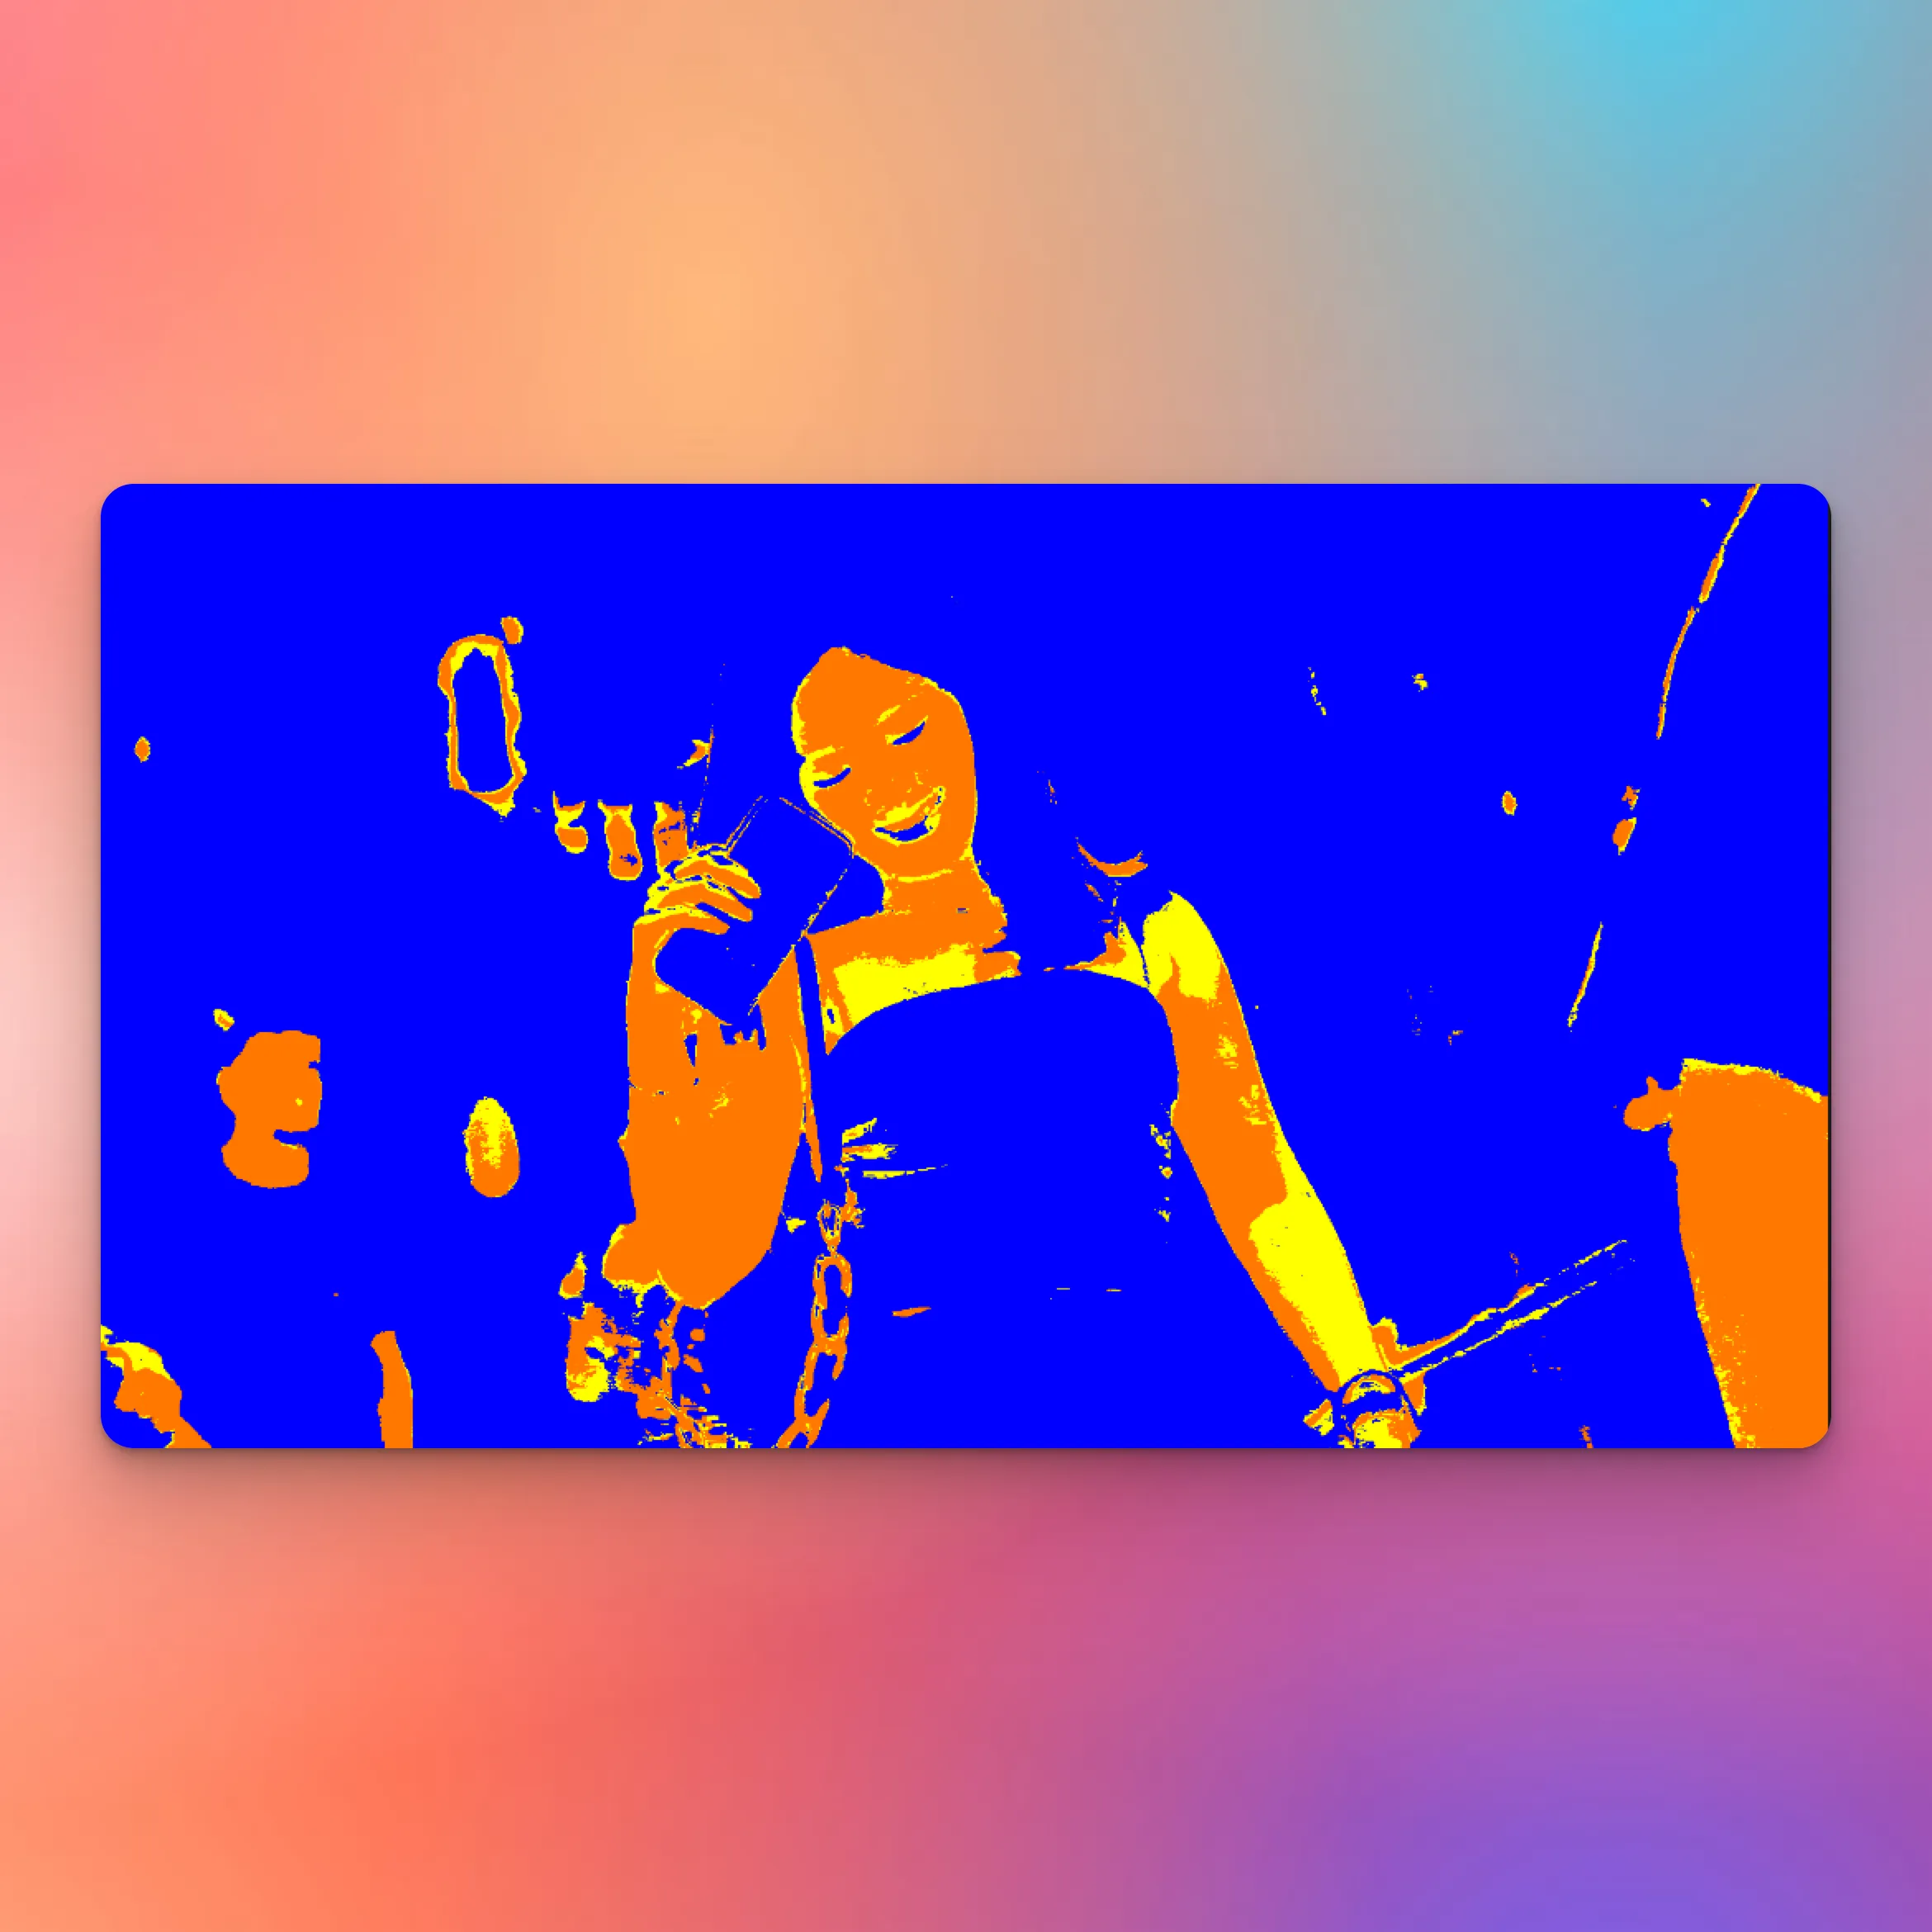
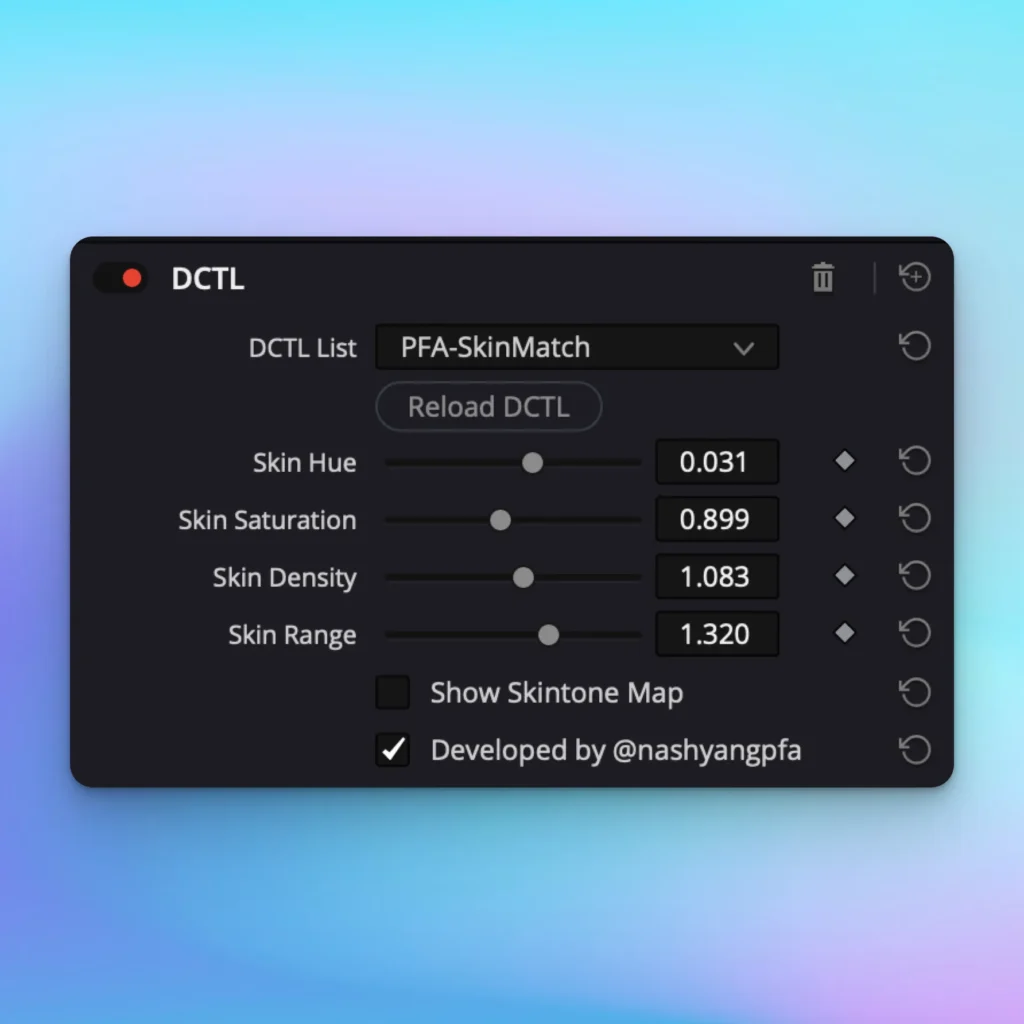
Time is money, and this tool can significantly reduce the amount of time you need to spend fixing your skin tone. This is often a crucial factor for clients, especially when it comes to the results they receive. If you truly value your time, you shouldn’t miss out on this deal. It addresses the common issue of adjusting skin tone after a very cinematic grade. Don’t miss this opportunity.

Original price was: $169.00.Current price is: $69.00.

PFA SkinMatch DCTL - Davinci Resolve

What Are the Best Practices for Using DCTL in Color Grading?

Tips for node tree set up

This tool is highly versatile, depending on how you choose to use it. However, it’s essential to have a clear goal in mind. Regardless of the complexity of your node tree, this skin adjustment should be the final step in your look development. It’s crucial as the last touch to refine your color grading. This ensures not only a cinematic look across the overall image but also perfect skin tones. This way, clients won’t point out any issues with incorrect skin colors.

Our tool is catered to save you time and streamline your workflow. It allows you to calibrate skin tones color without the need for multiple tools, scopes, and masks. By simply using the sliders and the skin tone map, you can achieve perfect alignment of skin tones. This ensures consistent color and smooth experience throughout your grading process.

Whether you are using different luma range, HSV, ARRI, Sony, or any other camera, flip your footage horizontally, vertically, square, vertical or landscape , this tool helps you offset any grading issues. It ensures that you always achieve perfect skin tones. Start your exploration now. Your color space and gamut don’t matter as long as you use this tool in the final node after your looks development.

Understanding Color Grading and Its Impact on Skin Tone

You can take our PFA color grading course to better understand the color grading process. This will show you how color grading can affect your skin tone if not properly separated. You will definitely need this tool to calibrate your skin tone to perfection. We always emphasize that color grading essentially is about skin tone and other colors.

When your skin tone is off, people will notice it immediately. Even if you have a beautifully graded background, they will point out that your color grading is off. By combining the knowledge of color grading and the utility of our DCTL, you can explore a whole new world on YouTube with your cinematic footage.

Upload original content, become a successful editor and colorist, and let people be amazed by your amazing shots. Follow my channel for more insights from colorists. We aim to develop a community that can help one another. You can export your calibration as LUT for your future use as well. 

PFA SkinMatch DCTL8 - Davinci Resolve PFA SkinMatch DCTL9 - Davinci Resolve

FAQ

What version of DaVinci Resolve Studio is compatible with DCTL?

DCTL is compatible with all major versions of Davinci Resolve, including versions 16, 17, 18, and 19. However, it must be the paid studio version. The free version of Davinci Resolve does not support DCTL.

What is the DCTL: Skinmatch tool in DaVinci Resolve?

The DCTL: Skinmatch tool is an innovative feature designed for DaVinci Resolve that allows colorists and editors to achieve perfect skin tones quickly and efficiently. This powerful tool utilizes advanced color grading techniques to analyze and adjust the skin tone of your footage, ensuring that it looks natural and appealing. By using PFA SkinMatch DCTL, you can streamline your workflow and focus more on creativity rather than technical details.

How does DCTL: Skinmatch improve my color grading process?

DCTL: Skinmatch significantly enhances your color grading process by allowing for precise adjustments to skin tone. With features like sliders for saturation, hue, and density, you can easily manipulate the color of your footage to achieve the desired look. This means less time spent on manual adjustments and more time spent creating stunning visuals. It’s like having a professional colorist by your side!

Can I use DCTL: Skinmatch for all types of footage?

DCTL: Skinmatch allows it to be used for various types of footage, whether it’s a cinematic film, a YouTube vlog, or a commercial project. The tool analyzes the skin tone in your shots, making it suitable for different lighting conditions and styles. Just upload your original content and watch how DCTL: Skinmatch transforms your visuals!

What are the system requirements for installing DCTL: Skinmatch?

To install DCTL: Skinmatch, ensure that you have the latest version of DaVinci Resolve installed. The system requirements include a compatible operating system (Windows, macOS, or Linux), a decent GPU for processing color grading, and enough RAM to handle high-resolution footage. For optimal performance, it is recommended to have a system that exceeds the minimum requirements of DaVinci Resolve.

You might also like